Showing posts with label chocolate. Show all posts

Tuesday, September 7, 2010

Monday Menu (9/6/10)

For Labor Day, we made some homemade taquitos and chimichangas.  What Bill did was start by heating up the oil in the deep fryer and when it was hot enough (around 360 degrees) he dipped a corn tortilla in the oil for about 2-3 seconds, then removed.  This makes it easier for rolling the taquitos so they don't crack open.  Then after there are about 10 corn tortillas all oiled up. Line up some meat about 1/4 from the edge on the tortillas (we used shredded roast turkey that we cooked in the crockpot over night) and then roll up and stab it with a toothpick.  Bill was able to poke two taquitos through the middles into each other.  He fried them for a minute, then rotated, and fried another minute.  If they didn't look done enough, he rotated a third time and fried another minute longer.  He drained then on a cooling rack with a cookie sheet underneath it to collect the excess dripping oil. 


For the chimichangas, we put a thin spread of beans about 1/4 from the edge, topped with meat (for this one we used ground beef that was cooked, drained, and had taco seasoning added to it), then a good sprinkle of cheese.


To roll up, take the bottom part of the tortilla, wrap up towards the top of the meat and tuck slightly under and hold it tightly together.


Then while holding the middle together, fold the two sides in.


 Then start rolling up.


Then when you roll it all the way up, place a toothpick in it and then deep fry in 360 degree oil for about 2 1/2 minutes on one side, flip, and then about 2 1/2 minutes on the other side.
Put on cooling rack to drip excess oil.

(By the way, don't you just love my mad drawing skills on Paint??)


For dessert, we had something like homemade Twix from this awesome site: Hoosier Homemade.  


They are SO much like Twix bars!  The only thing I would change would be lowering the peanut butter to 1/3 cup and increase the milk chocolate chips to 1 1/3 cups.  I would like to find some way to make a layer of chocolate on the bottom.  Maybe I could line the cake pan with parchment paper, make the topping but put it on the bottom, then while chocolate is still warm, place crackers on top.  Then let it chill in the fridge.  Then make the caramel middle, pour on top, top with crackers again, then chill in fridge again.  Then make the topping again, top the crackers, let chill in fridge until set.  Then slice and enjoy! :)
Wednesday, August 25, 2010

Monday Menu (8/23/10)

It has been a while since I have updated our Monday Menus.  I figure instead of trying to go back in time to catch up, I will just start now and if I add them along the way, then that will just be the icing on the cake!

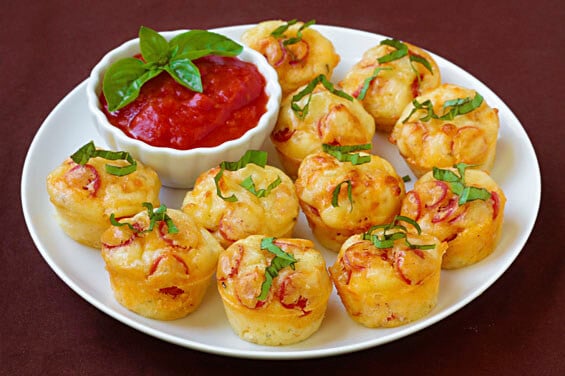
I didn't have time to snap any pictures of dinner because we scarfed them up too quickly. So I am using the picture from the site: Gimme Some Oven.

For dinner, I made:  Pepperoni Pizza Puffs

 
I made a double batch (48 mini ones) thinking that was plenty.  I didn't know that they are not very filling and they seriously disappeared faster than donuts at a Weight Watchers meeting.  I also made a few smaller adjustments to make them to our tastes:
  • First, I sprayed each little mini muffin cup with Baker's Joy.  I love it more than Pam when it comes to bready or cake type things because of the flour in the non-stick spray.
  • Second, I didn't add any of the fresh basil (mainly because I didn't want to buy it) and then forgot to add dried basil but it turned out fine without it. 
  • Third, I made a few puffs without pepperoni for Lily before adding the pepperoni.  After that, I made some pepperoni ones making sure to have enough batter for another variation.  To the remaining batter, I added some bacon crumbles so we had Nate's favorite pizza type: pepperoni and bacon. 
  • Fourth, I put an olive in the center of a couple of the muffin cups for Bill and I.
  • Lastly, to scoop the right amount of batter, I used a small cookie scooper (2 tsp).  I have THIS one and I LOVE it!

I only baked them for 15-18 minutes instead of the 20 minutes the recipe calls for.  As a family, we decided that these are better suited for an appetizer or snack and not for a dinner main dish.


For dessert, I made Chocolate Peanut Butter Covered Brownie Bites.

Believe me when I tell you, these are very rich and chocolaty.  I personally think that I would have preferred using Milk Chocolate instead of the Semi-Sweet.  Definitely going to make these again!!

Wednesday, December 16, 2009

Baking With My Girls

It was high time I taught my little cookie-munchers how to make the cookies they so happily devour. Today was Early-Out day which means that they are home a full two hours before they normally are. Since it was just us three, and the boys needed a treat to take to mutual tonight, I figured it was the perfect excuse to bust out the flour and get some cookies made.

I decided to start taking pictures just after the girls and I mixed the butter and sugars.


Lily is wearing my Christmas apron I won from the RMEF banquet this year. It is from the Hunter-Cowan store in town.
Rebekah is wearing the apron I made Bill a couple years ago.


Mmmm, look at that sugary-buttery concoction!


Lily usually does really well at cracking eggs for me when I make pancakes.


Lily didn't mind cleaning up the eggy mess.


Lily pouring in the eggs, while Rebekah pours in the vanilla.


Switching the mixer to on.


Now it is time for the flour. Rebekah is checking for bay leaves in the flour. You see, I keep whole bay leaves in the flour bucket and it keeps the weevils from invading my flour. I only need to add a few in this huge bucket and I am bug free!


Lily with a plastic butter knife to level the cup of flour.


Ok, my turn!! I am wearing the apron that my mother-in-law made for me.


I should know better by now than to hand over the camera to the girls when I am teaching them how to cook.... ok, so I posed for this picture... But still. :-) I am explaining to the girls what baking soda does for cookies.


See, this is me explaining how the cookie puffs up. I told you I was explaining baking soda! :-)


Rebekah adding some flour.... small amounts at a time.


I LOVE the look on Lily's face. When she was pouring the flour into the mixer, it made the flour poof up and drift everywhere. She didn't care for that much.


I let the girls pour the chocolate chips in. There are semi-sweet, white, and milk chocolate chips.


I had to explain to the girls how to stir in the chocolate chips without flinging cookie dough all over the kitchen.


Rebekah did manage to make a small amount fling out, but the girls were happy to eat the dough, so no harm done.


Lily enjoying the dough.


Rebekah REALLY wanted to eat that.


Look at the cute little cookie dough balls!!! I LOVE my cookie scooper!


Lily learning how to operate the cookie scooper.


Rebekah cracks me up in this photo. She is so gentle with that cookie dough that it looks like she is ready to tuck it in and read it a story.


It looks like Lily is blowing it kisses!


Rebekah all covered in flour scooping cookies to cool.


When all the cookie were done, Lily got the bowl and instead of using a spatula (why waste the time to get one) she used her fingers.


This is not the best picture, but this cookie looks like it is smiling at me and that chocolate chip on the left makes it look like it is sticking its tongue out at me!!


Ooooo, look at all that gooey goodness.... the kids are just waiting for the all clear.


Lily took a while but then settled on this one.


Lily so happy to finally get a baked cookie.


I love the look on her face.


She seriously did not take normal bites. She constantly gnawed at it as she shoved it in her mouth until it was gone.


Rebekah found the one she wanted.


She tore into that like a monkey on a cupcake.


Here she is saying, "Mmmmmm!"


She is trying to get the little bits of cookie off her lip.


What does a cookie need?? MILK! Lily and her milk bubble tower.


Oooo, that cookie has my name on it!! Look at all those chocolate chips!!!


Ah, this cookie is smiling at me, too!


It is cookie paradise. Mmmmmmmmmmmmm.


Here is the recipe (I halved this recipe since I didn't want 10 dozen cookies)

Chocolate Chip Cookies

1 cup granulated sugar
2 1/2 cups packed brown sugar
1 pound (4 sticks) butter, softened (DO NOT USE MARGARINE!)
3 large eggs (if you have to halve this like I did, just use two eggs)
1 1/2 teaspoons vanilla extract
1/2 teaspoon almond extract (optional, if not used, add an additional 1/2 teaspoon vanilla)
1 1/2 teaspoons salt
1 1/2 teaspoons baking soda
1/2 teaspoon cinnamon (optional, I rarely add it)
6 cups unbleached flour
Lots of chocolate chips (what ever kind you have on hand. I usually just dump some in until it looks good.... which is about 4 cups)
2 cups chopped nuts (optional, and I left them out this time because Lily does not like nuts in her cookies)

Preheat oven to 350 degrees F. Cream sugars and butter together. Blend in eggs and extracts. Mix well. Add dry ingredients, a little at a time. Stir in chocolate chips and nuts. Drop by (or use cookie scoop) tablespoonful onto ungreased cookie sheet (I use Air Bake, they are the best.) Bake for 8 minutes. Let them cool on the rack for about 5 minutes, then transfer to wax paper covered wire rack.

Makes about 10 dozen.

Saturday, December 12, 2009

Boston Cream Pie

Boston Cream Pie
(Also, if you scroll down, you will see how to make this into Mini Boston Cream Pies!)

1 package (3.4 oz) instant vanilla pudding
1 cup cold milk
1 1/2 cups thawed Cool Whip
1 round yellow cake layer (8- or 9-inch)

1 square unsweetened chocolate
1 tablespoon butter
3/4 cup powdered sugar
2 tablespoons cold milk

Make it:
Beat pudding mix and 1 cup cold milk with a whisk for 2 minutes. Stir in Cool Whip. Let stand 5 minutes.
Meanwhile, cut the cake horizontally into 2 layers with serrated knife. (or you can do what I do, I just bake smaller amounts in the pans so I don't have to cut it.)

Stack cake layers on serving plate, spreading pudding mixture between layers.

Microwave chocolate and butter in medium microwaveable bowl on high 1 minute; stir until chocolate is melted. Add sugar and 2 tablespoons milk; mix well. Spread over cake. Refrigerate 1 hour.

(if you chose to be brave and slice a full size 8- or 9-inch round cake in half, here is how to slice it evenly:
Place cooled cake later on serving plate. Make a 2 inch horizontal cut around side of cake using a long serrated knife. Then, cut all the way through the cake later to make 2 layers.)


To make MINI Boston Cream Pies, follow most of the recipe above. Except, instead of making 8- or 9-inch round cakes, make cupcakes. BUT, line the cupcake pans with cupcake liners and spray with Baker's Joy. And ONLY fill 1/4 to 1/3 full (with a regular cake mix, this should make 3 dozen cupcakes). Bake 8-12 minutes or until toothpick comes out clean. Let cool then stick in a ziplock baggy, single layer, and freeze them. When frozen (or mostly frozen, at least in the freezer for 30 minutes), take off cupcake liner and slice cupcake in half, horizontally. Make filling (same as above) and let sit in refrigerator for 5 minutes. Put into either a piping bag or a ziplock baggy (cutting a smallish hole for piping) and squeeze filling onto bottom cupcake layer. I swirled from the outer edge to the center. Then put the top cupcake on. Do this to all of the cupcakes. You may have to double the filling recipe to have enough filling (I would wait until you are done piping the first batch of filling to see if you need a second batch). DOUBLE the frosting recipe. BUT do it one batch at a time because it will cool to fast and then it will be too stiff to spread properly where it drips down the sides in a beautiful design. Refrigerate for 1 hour. Enjoy!

And this is what they should look like:

Look how darling those decadent chocolate drips are!


Mmmmm.... These are so fun to just gobble up! I think next time I will try to make these as those really mini cupcakes. Then they would be little pop-in-your-mouth bites!


Tuesday, December 8, 2009

Monday Menu (December 7, 2009)

I wish I would have taken a picture of the Quiche we made tonight. It was divine!

Quiche (adapted from a recipe given to me by my mother-in-law)

1 9-inch unbaked deep-dish pie crust
1 cup shredded mozzarella cheese
2 tablespoons flour
a little less than 1 tablespoon Chicken Flavored Better Than Bouillon (you can use chicken flavor instant bouillon)
2 cups cubed cooked turkey or chicken (we used rotisserie chicken)
3 pieces cooked bacon, crumbled
1 cup milk
3 eggs beaten well
1/4 cup finely chopped onions
Extra cheese

Preheat oven to 425 degrees Fahrenheit. Bake pie crust for 8 minutes. Remove from oven and reduce temperature to 350 degrees Fahrenheit.
In a medium bowl toss cheese, flour, and bouillon. Add remaining ingredients. Mix well. Pour into pie crust. Bake 45-60 minutes or until set. Sprinkle extra cheese on top. Let bake a minute longer. Remove from oven and let stand 10 minutes before serving.

I used a full tablespoon of that Better than Bouillon and felt it was a tad too salty. That is why I mention using less than a full tablespoon.


For dessert, I tried something completely new, with a bizarre dessert ingredient: potato chips. Now, before you start knocking it, you have GOT to try them!! They are very yummy!!


Peanut Butter Clusters

2 cups (12 oz.) peanut butter chips
1 cup (6 oz,) milk chocolate chips
1 1/2 cups dry roasted peanuts (I accidentally bought party peanuts and they still worked well)
1 cup crunched up ridged potato chips

In a microwave-safe bowl, melt peanut butter chips and chocolate chips; stirring every 30 seconds. Stir until smooth. Stir in peanuts and potato chips. Drop by level tablespoonfuls onto wax paper. Refrigerate until firm (I just let mine sit on the counter; it is plenty cold this time of year). Store in an airtight container.

Thursday, December 3, 2009

Chocolate Cranberry Cookies

I entered these into a contest at the National Cookie Network. They were made for the month of November. Each month has a secret ingredient, and November's was Cranberries.

Chocolate Cranberry Cookies
(these cookies baked at 6000 ft above sea level)
Makes 3 1/2 dozen


Ingredients:
1 stick butter, softened
3/4 cup granulated sugar
1/2 cup packed brown sugar
1 egg
1 teaspoon vanilla
4 ounces unsweetened chocolate (use four 1 ounce squares - melt and let cool but not harden. Or you can use Nestle Pre-Melted Unsweetened Chocolate like I did)
1 1/3 cup flour
1 teaspoon baking powder
1/4 teaspoon salt
1 cup chopped fresh cranberries
1 cup white chocolate chips
3/4 to 1 cup chopped pecans

Preheat oven to 350 degrees F.
Cream the butter and sugars until well mixed. Mix in egg and vanilla. Mix in chocolate until well combined. Stir in flour, baking powder and salt. Fold in cranberries, chocolate chips, and pecans. Use a size 50 cookie scoop (sorry, I don't know the measurement of who much it scoops, possibly a tablespoon) and scoop out cookies onto a greased cookie sheet (I used AirBake). Make sure the cookies are at least 1 inch apart. Slightly push down prior to baking. Bake for 8 minutes. Let cool on cookie sheet for about 5-8 minutes, then transfer to wax paper on counter. When cooled, you can either scarf down or drizzle with orange icing.

If you want orange icing, just mix a couple teaspoons with enough powdered sugar to drizzle easily. Stir until lumps are gone. Then drizzle over the top.

One thing I thought would be good to top them with is cream cheese frosting. If anyone tries that, let me know how it turns out.